gift
Rocket Mass Heater podcast gob
will be released to subscribers in: soon!
  • Post Reply Bookmark Topic Watch Topic
  • New Topic
permaculture forums growies critters building homesteading energy monies kitchen purity ungarbage community wilderness fiber arts art permaculture artisans regional education skip experiences global resources cider press projects digital market permies.com pie forums private forums all forums
this forum made possible by our volunteer staff, including ...
master stewards:
  • Nancy Reading
  • Carla Burke
  • r ranson
  • John F Dean
  • paul wheaton
  • Pearl Sutton
stewards:
  • Jay Angler
  • Liv Smith
  • Leigh Tate
master gardeners:
  • Christopher Weeks
  • Timothy Norton
gardeners:
  • thomas rubino
  • Jeremy VanGelder
  • Maieshe Ljin

10x10 Greenhouse with Raised Bed, in Tiny Backyard, Zone 5a

 
Posts: 217
Location: Ontario
13
  • Likes 8
  • Mark post as helpful
  • send pies
    Number of slices to send:
    Optional 'thank-you' note:
  • Quote
  • Report post to moderator

Moving my way over here from the Gardening forum, to get some feedback on the high tunnel greenhouse I'm building. My main goal with this is to extend my growing season, and protect my plants from critters. If you have some examples of things you have done in a small greenhouse/hoop-house space to make things efficient please share with me. Thank you!


Some measurements and details about the structures:

The raised bed is 8' x 43" x 21"h plus the pallet, but I will only be filling it a little more than half for now.

The greenhouse foundation is 10' x 10'

The hoop pole length will be 20' (two 10' lengths joined together) 6 hoops total

The foundation is made from 2 x 6 x 10 cedar, two boards cut at 120" and two cut at 117", and corner braced with 2x4 cedar 1ft long at the longest end, with a 45 degree angle cut on each end.

The raised bed is walled with recycled hardwood pallet wood, the base of the bed is 3/4" plywood, and it sits on top two 48" x 48" uline plastic pallets skids, that I picked up from a local distillery.

The hoops I will be using are 3/4" PVC pressure pipe schedule 40. I will not be using rebar in the middle of the pipes, but will be reinforcing the pipes with wood framing supported by the door frame.

I will be using 6 mil greenhouse plastic to cover the GH (this is how I am going to spell greenhouse now) it is 4 year rated.


Things I am aware of:

PVC is not UV resistant. (I will try to protect the PVC by putting a layer of gorilla tape over the part of the pipe facing the sun. Gorilla tape says it is UV resistant, maybe this will help.)

The process of recycling pallets is boring.

My yard is small

I have no cheap method of heating the GH in the cold season. (No Solution so far, although I suppose I could have a small RMH if I disguise it as a BBQ.)

I have no experience building a GH.


let's Begin.


This is where I'm at so far with lots of time to build. I also put together a seed starting shelf today, that I will probably put in the GH as a source of light and heat in the colder months. I used a metal Home Depot rack, a mylar space blanket, and two 40 watt led work lights. I had all this stuff laying around, so that was nice.


pollinator
Posts: 135
Location: Cave Junction, Oregon
7
hugelkultur forest garden foraging urban cooking food preservation
  • Likes 3
  • Mark post as helpful
  • send pies
    Number of slices to send:
    Optional 'thank-you' note:
  • Quote
  • Report post to moderator
One way you can fill your planter all the way up, is to do a sort of hugelkultur bottom layer and fill between logs with sand, sawdust, wood chips. Then use the soil you planned to use to top it up.
You are quite resourceful, happy gardening .. oh yeah .. have you seen the "cattle panel" greenhouses, could be a good fit for that bed YouTube has a bunch of examples to peruse, one of them may strike a chord. Here's a starter;
 
Posts: 1010
Location: In the woods, West Coast USA
206
  • Likes 4
  • Mark post as helpful
  • send pies
    Number of slices to send:
    Optional 'thank-you' note:
  • Quote
  • Report post to moderator
Steve, your 10x10 space might be a good candidate for a horseshoe-shaped raised bed, so you'd have more raised bed area than pathway.  (See diagram) No need for an opening in the back end, so you could make the path in the middle of the wall 3 feet wide, 6 feet in, across 3 feet parallel to the back wall, then 6 feet back to the door wall.   The bed edges can be as tall as you want, but maybe only 6 inches to 1 foot, made out of cinder blocks so you can change the arrangement if you want.  

Charles Dowding on YouTube has a great way of planting into compost over cardboard to stop the weeds.


HorseshoeRaisedBed.jpr.png
Horseshoe Raised Bed, Red path
 
Steve Harvey
Posts: 217
Location: Ontario
13
  • Likes 2
  • Mark post as helpful
  • send pies
    Number of slices to send:
    Optional 'thank-you' note:
  • Quote
  • Report post to moderator

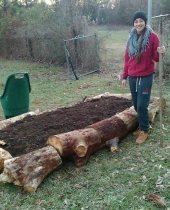
Roxanne Sterling-Falkenstein wrote:One way you can fill your planter all the way up, is to do a sort of hugelkultur bottom layer and fill between logs with sand, sawdust, wood chips. Then use the soil you planned to use to top it up.
You are quite resourceful, happy gardening .. oh yeah .. have you seen the "cattle panel" greenhouses, could be a good fit for that bed YouTube has a bunch of examples to peruse, one of them may strike a chord. Here's a starter;


Here is a diagram of how I'm going to fill the raised bed, do you think this could cause issues with plant growth? My plan is to bale garden on top of the hugelkultur filler inside the raised bed, for the first year. then let the straw decompose into compost, which will fill the raised bed eventually. I will layer each ingredient like a sandwich, as seen in the picture below.


I really like this design for the build. I will be modifying some things I think will give it more strength, or improve its function.


One thing I'd really like to add is these vertical supports, and have them support the hoops. They remind me of a reciprocal roof in a way, but I guess more like a reciprocal wall stud instead.


I also found this video to be very helpful, but I think he used too much wood in the framing, which adds more cost. I'd rather use 2x4's cut in half and frame with 1x2's instead.


Steve Harvey
Posts: 217
Location: Ontario
13
  • Mark post as helpful
  • send pies
    Number of slices to send:
    Optional 'thank-you' note:
  • Quote
  • Report post to moderator
Made a drain in the lowest corner of the raised bed. I also decided to go with a liner for the EPDM  pond liner to line the raised bed with because it is UV resistant, 45mil thick, and very flexible. I will also use it under the raised bed to keep the insulation dry. I also ordered materials to make a self watering system using rain water. I ordered both a soaker hose system, and a shrubbler drip system. I want to compare the two with use on straw bales.


Shrubbler drip


Soaker


EPDM Liner


Originally I didn't want to go with a liner, but I think this is best, otherwise the raised bed is just going to leak water and dirt everywhere, and wet floor insulation isn't really insulation.

 
Steve Harvey
Posts: 217
Location: Ontario
13
  • Mark post as helpful
  • send pies
    Number of slices to send:
    Optional 'thank-you' note:
  • Quote
  • Report post to moderator

Cristo Balete wrote:Steve, your 10x10 space might be a good candidate for a horseshoe-shaped raised bed, so you'd have more raised bed area than pathway.  (See diagram) No need for an opening in the back end, so you could make the path in the middle of the wall 3 feet wide, 6 feet in, across 3 feet parallel to the back wall, then 6 feet back to the door wall.   The bed edges can be as tall as you want, but maybe only 6 inches to 1 foot, made out of cinder blocks so you can change the arrangement if you want.  

Charles Dowding on YouTube has a great way of planting into compost over cardboard to stop the weeds.


I will check this guy out on youtube, Thanks.

While waiting for shipments I planned out how the truss supports for the hoops might work. How about this for a horseshoe layout?

 
Cristo Balete
Posts: 1010
Location: In the woods, West Coast USA
206
  • Mark post as helpful
  • send pies
    Number of slices to send:
    Optional 'thank-you' note:
  • Quote
  • Report post to moderator
That picture you've got of the $150 hoop house that has a wooden frame in the middle of the PVC hoops, that frame is important, because over time PVC hoops and even rebar hoops sag with the weight of whatever is on it, and big wind storms.  I had to do something similar, so with that in mind plan where your path will be.  
 
Steve Harvey
Posts: 217
Location: Ontario
13
  • Mark post as helpful
  • send pies
    Number of slices to send:
    Optional 'thank-you' note:
  • Quote
  • Report post to moderator

Another build plan changed up the truss design a little. This time showing how I am thinking of stretching the greenhouse plastic.


Steve Harvey
Posts: 217
Location: Ontario
13
  • Mark post as helpful
  • send pies
    Number of slices to send:
    Optional 'thank-you' note:
  • Quote
  • Report post to moderator

3D Time! This is not to scale. The trusses look much larger in the model than they will be irl. Also I may change the design, this design will take more wood than what I have, but not much more. Also the slope of the wall trusses wil more than likely be steeper and shorter, and the ceiling joists longer and lower. I am aiming for at least 7ft of height inside. This just gives me an Idea on how things might fit together, and whether the design would actually be load bearing.


Steve Harvey
Posts: 217
Location: Ontario
13
  • Mark post as helpful
  • send pies
    Number of slices to send:
    Optional 'thank-you' note:
  • Quote
  • Report post to moderator


Steve Harvey
Posts: 217
Location: Ontario
13
  • Mark post as helpful
  • send pies
    Number of slices to send:
    Optional 'thank-you' note:
  • Quote
  • Report post to moderator
Here is another design, I think this is better and uses less material while still strong enough.


Steve Harvey
Posts: 217
Location: Ontario
13
  • Mark post as helpful
  • send pies
    Number of slices to send:
    Optional 'thank-you' note:
  • Quote
  • Report post to moderator


Steve Harvey
Posts: 217
Location: Ontario
13
  • Mark post as helpful
  • send pies
    Number of slices to send:
    Optional 'thank-you' note:
  • Quote
  • Report post to moderator
And if this design isn't strong enough I can add supports for the top of the hoops to prevent sagging, like this.


Steve Harvey
Posts: 217
Location: Ontario
13
  • Mark post as helpful
  • send pies
    Number of slices to send:
    Optional 'thank-you' note:
  • Quote
  • Report post to moderator
I think this may be the winner. Waaaaaayyyyyyy less material and very strong, for some reason I had it in my head I needed 6 hoops. I think 4 will do just fine, I hope.


Steve Harvey
Posts: 217
Location: Ontario
13
  • Mark post as helpful
  • send pies
    Number of slices to send:
    Optional 'thank-you' note:
  • Quote
  • Report post to moderator


Steve Harvey
Posts: 217
Location: Ontario
13
  • Mark post as helpful
  • send pies
    Number of slices to send:
    Optional 'thank-you' note:
  • Quote
  • Report post to moderator

Finished building the raised bed and lining it. installed the automatic watering system and have it running off a timer. The water usage is very efficient, I have noticed, each plant will have its own drip which will turn on and off approximately every 2 hours for 10 minutes or so. I will need to play around with the timing and settings, but overall I think this will work well. I was surprised on how quick water started draining out the drain at the bottom of the box, I will have to figure out a way to recapture this drain water and recirculate it back into the rain barrels.


gardener
Posts: 814
Location: Durham, NC
338
hugelkultur gear urban cooking building writing woodworking
  • Likes 1
  • Mark post as helpful
  • send pies
    Number of slices to send:
    Optional 'thank-you' note:
  • Quote
  • Report post to moderator
This thread is great.  I'm taking inspiration from it.  The only comment I have at this time is, those rain barrels inside the membrane would be a great thermal mass for temperature regulation.  I didn't look closely at whether that's possible in your design.  But I'm trying to incorporate water into my greenhouse plan for thermal mass and moisture.
 
Steve Harvey
Posts: 217
Location: Ontario
13
  • Mark post as helpful
  • send pies
    Number of slices to send:
    Optional 'thank-you' note:
  • Quote
  • Report post to moderator

Rob Lineberger wrote:This thread is great.  I'm taking inspiration from it.  The only comment I have at this time is, those rain barrels inside the membrane would be a great thermal mass for temperature regulation.  I didn't look closely at whether that's possible in your design.  But I'm trying to incorporate water into my greenhouse plan for thermal mass and moisture.


I could put one inside, that is a good idea. Maybe run a low wattage heater in it, and have it loop to the outside barrels to keep them from freezing in the winter. I am trying to have the water in the barrels equalize through siphon, but the white pvc is not very flexible. I will maybe try grey electrical conduit instead, and also run my electrical underground to protect it eventually.


Rob Lineberger
gardener
Posts: 814
Location: Durham, NC
338
hugelkultur gear urban cooking building writing woodworking
  • Likes 2
  • Mark post as helpful
  • send pies
    Number of slices to send:
    Optional 'thank-you' note:
  • Quote
  • Report post to moderator
Again, riffing, not having had the time to look at your design...

I am concerned that cycling water between 3 outside barrels and one inside would not work.  I don't think one warm barrel is enough to stave off the others freezing.  But it would bleed off the stored heat in that one barrel, which removes its utility as a heat sink.

Having all four barrels inside would be a much better defense against freezing and also would be four times the thermal mass.

These are just off the cuff remarks cause I'm multitasking at the moment.
 
Steve Harvey
Posts: 217
Location: Ontario
13
  • Mark post as helpful
  • send pies
    Number of slices to send:
    Optional 'thank-you' note:
  • Quote
  • Report post to moderator

Rob Lineberger wrote:Again, riffing, not having had the time to look at your design...

I am concerned that cycling water between 3 outside barrels and one inside would not work.  I don't think one warm barrel is enough to stave off the others freezing.  But it would bleed off the stored heat in that one barrel, which removes its utility as a heat sink.

Having all four barrels inside would be a much better defense against freezing and also would be four times the thermal mass.

These are just off the cuff remarks cause I'm multitasking at the moment.


Thanks Rob, for your input. I have decided to put the barrels inside the greenhouse for sure, after researching the benefit of this. I am interested to see how warm the greenhouse will be with the decaying straw and water barrel thermal mass inside during winter. I was also considering double layering the greenhouse plastic and having a blower to generate an air gap between the two layers. As you can see I have two of the trusses completed and will be finishing the other two soon, for a total of 4. I am taking my time with this project since it is all experimental, and I want to make sure the construction of this greenhouse will be strong enough to withstand the winter. So far I am very impressed with the strength of the truss design.


Steve Harvey
Posts: 217
Location: Ontario
13
  • Mark post as helpful
  • send pies
    Number of slices to send:
    Optional 'thank-you' note:
  • Quote
  • Report post to moderator

Got a bit more done.

 
Steve Harvey
Posts: 217
Location: Ontario
13
  • Mark post as helpful
  • send pies
    Number of slices to send:
    Optional 'thank-you' note:
  • Quote
  • Report post to moderator
Finished the cover over the raised bed. After monitoring the temperature of the raised bed this morning, I was very surprised to see the air temp to be over 85F with a night time low of below 50F. I lifted the cover for the daytime and the temps are sitting between 80-85F. My plants I have growing are doing well, but I have an issue with loopers eating leaves like crazy. Being new to gardening I researched ways to deal with this, and have been washing the leaves with an organic soap solution. I did not get as many plants planted as I hoped, but as I am new to all this, and I am having this looper issue, it is probably probably a good thing. I am glad to have the amount of plants here just to test the greenhouse this winter.


Steve Harvey
Posts: 217
Location: Ontario
13
  • Mark post as helpful
  • send pies
    Number of slices to send:
    Optional 'thank-you' note:
  • Quote
  • Report post to moderator

The beginning of plastic wrapping process. Getting there.


Steve Harvey
Posts: 217
Location: Ontario
13
  • Mark post as helpful
  • send pies
    Number of slices to send:
    Optional 'thank-you' note:
  • Quote
  • Report post to moderator
Here you can see how I pinched the plastic between two pieces of nailing strip. Lots of pulling and stretching the plastic as tight as possible, then I nailed the strip in with just small finishing nails and then screws.


This has made the plastic on the sides nice and tight.


Here you can see the metal T brackets I bent to hold the vertical posts to the foundation. These worked very well.


You can bend them to reinforce the corners as well.


Now I just need to finish the end walls


Steve Harvey
Posts: 217
Location: Ontario
13
  • Likes 1
  • Mark post as helpful
  • send pies
    Number of slices to send:
    Optional 'thank-you' note:
  • Quote
  • Report post to moderator
Lettuce and arugula is growing nicely. Honestly I don't even know what I planted. Picked some of it today for the first time and it was delicious. Originally I just sprinkle the seeds around with no real care for spacing, it seemed to work well. I also finished the door today working into the cold dark evening, just need t finish the back wall and it is done.


Steve Harvey
Posts: 217
Location: Ontario
13
  • Likes 2
  • Mark post as helpful
  • send pies
    Number of slices to send:
    Optional 'thank-you' note:
  • Quote
  • Report post to moderator
 
Posts: 41
6
fungi foraging medical herbs seed
  • Mark post as helpful
  • send pies
    Number of slices to send:
    Optional 'thank-you' note:
  • Quote
  • Report post to moderator
Hi, Great little greenhouse. I plan to use our covered hoop like shelter for a hoophouse and will use many of your ideas. I noticed a pressure sprayer on the rain barrels. How do you use this with the drip systems? I have rain barrels but can't get enough pressure for a hose to work faster than I can use a watering can. Would love to make a less labor intenstive way to water when there in no rain.
 
Posts: 49
8
5
hugelkultur foraging homestead
  • Mark post as helpful
  • send pies
    Number of slices to send:
    Optional 'thank-you' note:
  • Quote
  • Report post to moderator
How does your mylar blanket seed starting shelf work? I tried something similar--but not enclosed--in my cellar last year with ho-hum results. I love the idea of the space blanket, though.

I was moving stuff in my upper woods this morning--digging an erstwhile "poop pile" actually. And I decided that spot, once I used the composted  sh*t could be a great place for a small greenhouse. So your post is quite timely for me. Thanks for the inspiration.
 
Posts: 529
Location: Eastern Kansas
29
  • Mark post as helpful
  • send pies
    Number of slices to send:
    Optional 'thank-you' note:
  • Quote
  • Report post to moderator
Has anybody tried heating a greenhouse with incandescent Christmas lights? This gent says it is possible if the weather is not too cold: https://www.youtube.com/watch?v=rWasTEXj-sE

Winter in Kansas is cold enough so that they would not help mid-winter, but I would not mind getting more cold relief in the Fall! I like to plant hardy greens and harvest them until it gets too cold inside.
 
Posts: 312
Location: USDA Zone 7a
29
books food preservation wood heat
  • Likes 2
  • Mark post as helpful
  • send pies
    Number of slices to send:
    Optional 'thank-you' note:
  • Quote
  • Report post to moderator
What a sweet little hoop house.  For not having made one before, you really did a nice job.  The wood supports look like they'll hold up to any snow load and the curved slope will help a lot too.  An alternative to gorilla tape to protect the plastic from the pvc material is to spray paint the pipes with UV guard plastic paint.  I found some at Home Depot that was under $5/large can.  I stacked my pipe on top of cardboard laid on the ground and held them tight with stakes on either side of the pipe every 3 -4 ft.  After spraying all exposed surfaces simply 1/4 turn the pipe to expose what was touching and re-spray.  Did 2 coats. It was quick and easy.  Wondering what you used for insulating the floor that you mentioned.  I thought it looked like you had put wire on the bottom to keep gophers out but that wouldn't seem necessary if you have a raised bed above pallets. How much snow do you typically get during a heavy storm?  So many great ideas being shared on this post!


Posts: 443
Location: Indiana
58
5
  • Likes 2
  • Mark post as helpful
  • send pies
    Number of slices to send:
    Optional 'thank-you' note:
  • Quote
  • Report post to moderator
I built a 14 ft X 14 ft X 8 ft hoop house greenhouse about 3 1/2 years ago. I place the ends of 2 ea pvc pipes linked together to make each hoop into larger PVC pipes pounded 12" to 14" into the ground. The base is 4" X 4" beams laid on the cement foundation "feet" and it has two fairly solid ends of plywood and 2" x 4" construction with plywood door openings. The covering was a 6 mil layer, with a nylon 1" mesh over that, and then another layer of 6 mil plastic on top. The nylon mesh was to get somewhat of a double-wall for insulation and to stop condensation.

My idea was to set up a small Aquaponics system in there BEFORE I checked on equipment and prices. I stopped that build, but, I may have run across a solution whereby I will need a lot less "hardware" than originally laid out in design. I want to use 3 ea 50 gallon heavy duty deep water troughs (or possibly 4 ea.) set up in a stair-stepped fashion. The bottom one would have to be more than half buried in the ground and that one would contain the fish if I ever get that far with the build. The other 2 or 3 tanks would be for using flotation devices to grow the plants. Only one pump would be required in the newer design and that would be from the fish tank up to the top tank. Siphons would then drain the water back down through all the 3 or 4 tanks, running for about 15 minutes every hour.

It will be a long haul to get there as I still need to apply the new cover and it is almost already too late to do that this late into fall.

Eventually, on the opposite side of the greenhouse I would have a shelving unit running for growing lettuces. The pumping setup would be similar with only one pump and just a large reservoir of water used rather than a large tank. Each shelf would hold a 4 ft section of guttering capped a both ends. Each 4 ft. section would have a small version of a siphon and allow water to drain down through either 4 or 5 levels of guttering. The reservoir could possibly even be the fish tank if opposing 15 min. pumping cycles were to happen.

This is all just my pipe dreams at present. Due to some coming surgery on my left hand the covering is going to wait for near Spring. From there I'll have to take it a step at a time. Sa la vie!!!
 
Steve Harvey
Posts: 217
Location: Ontario
13
  • Likes 1
  • Mark post as helpful
  • send pies
    Number of slices to send:
    Optional 'thank-you' note:
  • Quote
  • Report post to moderator

j flynn wrote:Hi, Great little greenhouse. I plan to use our covered hoop like shelter for a hoophouse and will use many of your ideas. I noticed a pressure sprayer on the rain barrels. How do you use this with the drip systems? I have rain barrels but can't get enough pressure for a hose to work faster than I can use a watering can. Would love to make a less labor intenstive way to water when there in no rain.


I used the sprayer to spray organic soap and water solution on the plants when I had a pest issue. The drip system is good for keeping the lid closed and watering, I just put a pond pump in a bucket and turn it on to water., however I noticed that in the fall I didn't need to water much at at all, roughly once every 2 weeks, because the lid on the raised box and the straw held in moisture a lot.  I bought a cheap pond pump to pump water from my barrels, but the pressure is not great on the pumps either.
 
Steve Harvey
Posts: 217
Location: Ontario
13
  • Likes 1
  • Mark post as helpful
  • send pies
    Number of slices to send:
    Optional 'thank-you' note:
  • Quote
  • Report post to moderator

Terri Matthews wrote:Has anybody tried heating a greenhouse with incandescent Christmas lights? This gent says it is possible if the weather is not too cold: https://www.youtube.com/watch?v=rWasTEXj-sE

Winter in Kansas is cold enough so that they would not help mid-winter, but I would not mind getting more cold relief in the Fall! I like to plant hardy greens and harvest them until it gets too cold inside.


Heating a hoop house is not an issue, the sun does that for free during the day up until mid November, at least where I live. Trying to heat a small greenhouse in winter where I am from, with electricity would not be economical, but using at least 2 layers of plastic protection like my house, will keep the plants warm enough to stay alive and not wilt in cold weather. The real issue is a lack of sunlight when the sun is lower in the sky in winter. I was able to harvest greens from my hoop house up until now, end of November. I will hopefully be able to replant in April and grow until the end of November next year so 8 months.
 
Steve Harvey
Posts: 217
Location: Ontario
13
  • Likes 1
  • Mark post as helpful
  • send pies
    Number of slices to send:
    Optional 'thank-you' note:
  • Quote
  • Report post to moderator

Denise Cares wrote:What a sweet little hoop house.  For not having made one before, you really did a nice job.  The wood supports look like they'll hold up to any snow load and the curved slope will help a lot too.  An alternative to gorilla tape to protect the plastic from the pvc material is to spray paint the pipes with UV guard plastic paint.  I found some at Home Depot that was under $5/large can.  I stacked my pipe on top of cardboard laid on the ground and held them tight with stakes on either side of the pipe every 3 -4 ft.  After spraying all exposed surfaces simply 1/4 turn the pipe to expose what was touching and re-spray.  Did 2 coats. It was quick and easy.  Wondering what you used for insulating the floor that you mentioned.  I thought it looked like you had put wire on the bottom to keep gophers out but that wouldn't seem necessary if you have a raised bed above pallets. How much snow do you typically get during a heavy storm?  So many great ideas being shared on this post!


I had about 6" of snow on it the other day and it was wet snow, it held up great. I was thinking about insulating the floors but I am thinking against it, because I don't want critters living in the insulation. I think gravel would be better for thermal mass instead. I like the uv paint idea, will have to do this in the future. I must admit I am a little nervous about a serious snow storm because we can get 1ft or more in one night, and I could really feel the weight of the snow when trying to push the snow off the roof from the inside of the hoop house, with a broom. I think I will just have to keep an eye on it and clear the snow off if it builds up too much.
 
Rocket Scientist
Posts: 4522
Location: Upstate NY, zone 5
573
5
  • Likes 2
  • Mark post as helpful
  • send pies
    Number of slices to send:
    Optional 'thank-you' note:
  • Quote
  • Report post to moderator
You don't want insulation under the floor of a greenhouse unless you are keeping it REALLY warm, like over 60-70F all winter. The ground will be 50-55F deep down all year depending on your local climate, and will tend to bring the rest of the space toward that temperature, so insulation will let a greenhouse get hotter in summer and colder in winter. Having perimeter insulation so frost doesn't get in around the edges is good.
 
Denise Cares
Posts: 312
Location: USDA Zone 7a
29
books food preservation wood heat
  • Likes 1
  • Mark post as helpful
  • send pies
    Number of slices to send:
    Optional 'thank-you' note:
  • Quote
  • Report post to moderator
I think you have enough wood supports to hold up easily in one to two feet of snow.  Keep the plastic taut and the snow should slide off with a little push.  What about laying down red clay brick or cement stepping blocks/squares on the floor to absorb some heat?  Or perhaps wood chips would provide some insulation too.  As they decompose they would add to your soil's nutrient density and encourage redworms.
 
gardener
Posts: 2514
Location: Ladakh, Indian Himalayas at 10,500 feet, zone 5
838
trees food preservation solar greening the desert
  • Likes 1
  • Mark post as helpful
  • send pies
    Number of slices to send:
    Optional 'thank-you' note:
  • Quote
  • Report post to moderator
Are you able to reach into the raised bed from all sides? It was a perfect width, about 3'6" I think you said, for doing that. But the space between the bed of the greenhouse looks pretty narrow, and the wall maybe bends in -- is it easy enough walk around it?

Check out Eliot Coleman's books about greenhouse gardening in Maine. He says that despite the short winter day lengths, if you can get winter crops to a decent size before winter sets in you can harvest fresh things all winter, mostly salad crops. I was inspired by his books and am growing salad through the winter in my greenhouse, but I'm a lot further south than you are.
 
Jesse Glessner
Posts: 443
Location: Indiana
58
5
  • Mark post as helpful
  • send pies
    Number of slices to send:
    Optional 'thank-you' note:
  • Quote
  • Report post to moderator
Is there enough space under your raised bed - or could you remodel the bed - so you could lay your barrels on their sides underneath and have your bed supports straddle the barrels? That would free up a LOT of space in your GH if that is possible.

Ever thought of adapting to an automated watering system? There are several different varieties out on the Net for such, however, one of the simplest probably would be the Raspberry Pi system. The Rpi hardware consists of many varieties of add-on functionality like water temps, humidity, valve operations (with other specialized hardware), and you can capture all of the time-stamped data you want from the system fairly easily.

Below are some links if any of you are interested in this type of setup as starting points on how these operate. The Water System Intro is probably the best as it shows diagrams as well as explanations.

WATERING SYSTEM - INTRODUCTION
https://www.instructables.com/WATERING-SYSTEM-INTRODUCTION/

Raspberry pi controlled greenhouse — Circuit and code
https://medium.com/@pravenj/raspberry-pi-controlled-greenhouse-circuit-and-code-a0434df4151d

DIY Greenhouse Control Box Build Using a Raspberry Pi
https://pexpeppers.com/blogs/pepper-growing/diy-greenhouse-control

Maximum Yield – Raspberry Pi – Low Cost Sensors
https://www.maximumyield.com/low-cost-sensors-and-greenhouse-control-systems-raspberry-pi/2/17648
 
Steve Harvey
Posts: 217
Location: Ontario
13
  • Likes 2
  • Mark post as helpful
  • send pies
    Number of slices to send:
    Optional 'thank-you' note:
  • Quote
  • Report post to moderator

Ellen Schwindt wrote:How does your mylar blanket seed starting shelf work? I tried something similar--but not enclosed--in my cellar last year with ho-hum results. I love the idea of the space blanket, though.

I was moving stuff in my upper woods this morning--digging an erstwhile "poop pile" actually. And I decided that spot, once I used the composted  sh*t could be a great place for a small greenhouse. So your post is quite timely for me. Thanks for the inspiration.


The indoor seed starting shelf did not turn out to be the best solution for starting seeds, I have found a much better way with a method that uses pop bottles. See the link below. Basically the pop bottle acts like a greenhouse inside a greenhouse and it allows you to start seeds outside, which is beneficial because the plants will already be acclimated to the temperatures and conditions which they will be growing at, and do not suffer shock when transplanting from indoors to outdoors.

Pop bottle greenhouse

These are ideas based on Elliot Colemans research, you should look up his information on greenhouses, as they are really smart. I also like this post I came across of another Permie who made really cheap and easy coldframes inspired by E.C. You could maybe combine these with the pop bottle idea and get a warm enough temp for starting seeds outdoors even when it is cold. The pop bottle idea isn't just good for temperature, it is also useful for conserving water, basically you can visually inspect the bottles and if there is condensation in the bottle, you don't have to water the seedlings. This is a really nice feature because it gives you a visual reference to know when to water your plants, which is not very often with this system.

Interesting-tip-building-coldframe
 
Steve Harvey
Posts: 217
Location: Ontario
13
  • Likes 1
  • Mark post as helpful
  • send pies
    Number of slices to send:
    Optional 'thank-you' note:
  • Quote
  • Report post to moderator

Rebecca Norman wrote:Are you able to reach into the raised bed from all sides? It was a perfect width, about 3'6" I think you said, for doing that. But the space between the bed of the greenhouse looks pretty narrow, and the wall maybe bends in -- is it easy enough walk around it?

Check out Eliot Coleman's books about greenhouse gardening in Maine. He says that despite the short winter day lengths, if you can get winter crops to a decent size before winter sets in you can harvest fresh things all winter, mostly salad crops. I was inspired by his books and am growing salad through the winter in my greenhouse, but I'm a lot further south than you are.


I can really only access the bed from the front, but I am going to redesign the raised bed cover and replace it with an A shape design, with a horizontal hinged window on the front, if that makes sense. This way I will be able to access the bed easier by just raising the hinged panel rather than removing the whole lid, if that makes sense.

I am familiar with this author, and really like his work. I also like testing things through trial and error, and discovered that Arugula grew really well in my raised bed all the way up to December even. I would like to have my raised bed producing mainly Arugula as it is now my favorite type of green, and is very nutritious, and grows very fast. I was really amazed at how well it grew in the straw compared to other things I planted that did not do so well.    
 
A lot of people cry when they cut onions. The trick is not to form an emotional bond. This tiny ad told me:
Special fundraiser JUST for the permaculture bootcamp!
https://permies.com/w/bel-fundraiser
reply
    Bookmark Topic Watch Topic
  • New Topic