Cristobal Cristo

+ Follow
since Jul 20, 2020
Merit badge: bb list bbv list
For More
Sierra Nevada foothills, 350 m, USDA 8b, sunset zone 7
Apples and Likes
Apples
Total received
In last 30 days
13
Forums and Threads

Recent posts by Cristobal Cristo

Daniel,

For #1 you can use a heat loss calculator to determine the heater size.
For #2 there is not much work-around. It takes time: planning, collecting materials, more planning and building.
13 hours ago
Masonry stoves on the upper floor were traditionally placed in the corners of the rooms, so it would be easy to reinforce that corner with double T-bars. I have provided an image from some old masonry building book before and can share again if you wish.

I think concrete block could be used to build 4 columns, with 1/2 or 5/8" rebar, grouted. Solid concrete columns with more rebars and stirrups will be much stronger - it would make sense in a seismic zone. They would not be exposed directly to a tornado, but I would opt for solid concrete in this case. I have not seen it done, because of tradition of corner placement, but it would be logical to do so. If the floor will be reinforced concrete then I would talk to an engineer so he could incorporate the pillar into entire structure and it would actually help to distribute the loads of a heavy upper floor slab, especially if the room has large dimensions.
The column reinforcement would be between 1-10% of the column cross section area, so for a column fi=12"/300 mm, and minimum 1% it would be 4 rebars 5/8", for 2% it would be 7 such rebars, etc. Stirrups would be placed every 6".

Will all your walls be masonry? If yes then heating entire house with one heater will be difficult. Masonry houses had traditionally one heater per room or one heater shared by 2 rooms.

Have you selected what type of ICF you are going to use? I recommend Faswall - no plastic and breathing walls that can be beautifully finished with natural plasters.

After edit
Actually it would be better to build a rectangular structure (like an elevator shaft) for the heater support. It will be more stable than columns. If you plan for central location then you will also have to think about the chimney in that location and its foundation. My chimney weight is around 6 tons and has 3 flues. Yours would be probably smaller, but taller, so similar weight. Probably the best solution would be to place the heater and the chimney close to the center of a wall and part of that wall would be the chimney itself. In this case the heater would be resting on a pilaster being part of the same wall. If the other side of that wall would be kitchen, the kitchen stove would exit to another flue of the chimney. If you share your sketch of the plans we will think about the most optimal location.
16 hours ago
It actually is $300, but for square foot if owner built with some hired help,  world top materials, years of study and research and extreme sacrifice.

Anne, California has adobe chapter in its building codes. You need engineers plans (and you need it even for custom sticks here).

I spent around $300 for protective sheeting to protect materials and tons of tools from the rain.
21 hours ago
cob

Sophie Hatter wrote:Researching about RMH is how I found this site!  I bought raw land, have cleared a small bit of it, and am working on house design now...


Hi Sophie,

If you have not built the house yet, this is the right moment to think about chimney and heater placement.
My recommendations:
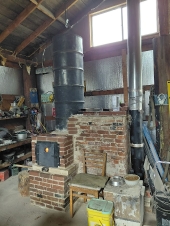
-if you are going to build some form of gabled roof and the chimney will be masonry then it's good to place it centrally so it will exit through the ridge - you will avoid more complicated roof flashing behind the chimney
-masonry chimney can have several ducts for different heaters; the ducts can be clay flues insulated with perlite/vermiculite or double walled stainless
-it makes sense to place the heater in the central spot of the house
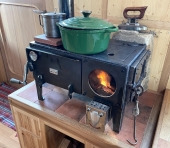
-if you also want to build a kitchen stove, please consider placing it on the kitchen/bathroom wall, so some small bell will also heat your bathroom
-place the heater in the room where you want the heat - basement placement, floor channels. etc. is some theory that is being discussed but I never see examples of such builds; they would be possible but much more complex and more difficult to build especially for a first time builder
-if the heater will be placed on the ground floor then prepare a properly reinforced concrete slab
-if it will be placed on an upper floor you can put it in the corner of the room (with additional diagonal floor reinforcement in that spot) or in any place if the heater pad will be supported on some columns placed on the ground level
2 days ago
Kimi,

I do not have floor-oiling experience, but I use tung oil for all the wood projects.
I like to warm the bottle first in the sun to make it more liquid (also Walrus brand). I apply it with a paint brush and after few hours I remove excess with paper towel. If excess will be left on low porosity hard wood (for example red eucalyptus) then the next day a gummy layer will form. Pine and redwood absorb it quickly. The floor would also have some porosity so excess oil would be probably absorbed before drying.
I have picked tung over linseed, because supposedly it protects the wood better against elements - it's more water resistant. It oxidizes/hardens faster and it matters a lot when working in my outside, dusty workshop.
I use linseed oil for blackening steel and cast iron.
I'm still considering oiling my (fired) terracota floors and if I do, I would use tung oil for the same reason - the speed of drying.
2 days ago
I read it and it makes sense, but I also believe that the small/young trees must be helped, because when I was not helping them they were dying and losing 30 trees per year (the worst when they die 2 years after planting)became exhausting. Of course 300 trees that I planted are not sufficient pool of data, because all of them were different species or cultivars and I can not in any scientifical way isolate what stopped their early demise. My strongest experience is what I mentioned before - disturbed/ripped soil (by buldozer) created conditions for lush growth. It's a very interesting topic. It's similar to dry farming - I read so many articles and some books before having my own orchard, but did not have enough experience to realize that what works for someone even few miles away will not work for me in my valley microclimate. Usually people talk about successful/existing orchards and do not focus on the crucial aspect of establishing pencil thin trees with no water.
Even after removing climatic conditions my case is different than yours just because my clay layer is maybe 20" thick (only in the western part of the orchard) and then decomposed granite starts to appear, so roots of my trees will need less time to drill into this lower layer with good drainage and better availability of nutrients. Also the fact that I stopped experimenting with traditional central European cultivars helped a lot.
One of my findings is that yellow European plums are weaker than purple ones and similar discovery for Apples - from 20 cultivars (all on Antonovka) I had, the following survived:
-Belle De Boskoop (blooming now)
-Black Oxford (buds opening)
-Spitzneburg (blooming now)
-Redfield (blooming now)
-Antonovka (yellow, but strong) with a lot of bloom and hopefully will produce something this year
-Bramley (blooming now)
-2 Dolgo seedlings (one blooming)

Russets were dying quickly and without exceptions.
I also have Lodi but its growth is arrested and after 5 years it's still 20" tall.
Grafting was always a failure.

6 days ago
There are different approaches to tree planting. At the beginning I was planting "naturally" and everything was dying, also "naturally" in bad soil, with manual watering, no amendments and gophers. Later I have noticed that the spots that got deep ripped and disturbed produced extremely thick vegetation.
It's possible that mature tree will handle bad soil, but before it grows - it will be tormented (in my case) by extreme heat, late frosts, sun, winds, hard-as-brick clay (in some spots), gophers. Since I was losing a lot - due to simplified planting and vast array of species and cultivars I started improving things.

My current approach is:
-plant more moisture demanding trees at the bottom of the slope: all prunus, pears, quinces, chestnuts, higher I plant apples, pistachios, mulberries, persimmons and at the top olives, some figs, Italian pines, pomegranates
-avoid cultivars that were developed in oceanic climate of central Europe/Pacific North/humid Asia or from east of the Rockies
-if I encounter heavy clay I'm trying to put there prunus on Myrobalam rootstock
-I plant in January and February
-all plants (except older, large transplants) go into wire cage (1/2" openings), fi 12", height 16-24" to protect from gophers
-I dig a hole at least twice the cage diameter at 1.5 times the height
-the soil from the hole is mixed 1:1 with compost (eucalyptus chips + sheep manure)
-if the soil is heavy clay I use 1:1:1 soil, compost, coarse sand
-I mulch with wood chips
-if the tree is very thin or sensitive I put a protective sleeve
-they are drip irrigated with 2 emitters (40 l/h each) and irrigated for half an hour at a time (two irrigations in summer per week, 3 if temperatures are over 40 C)

After I tested multiple cultivars and implemented all improvements the trees are dying at much lower rate and they finally produce fruits - more every year.
6 days ago
Gilbert,

Do you know what is the thickness of the clay layer? if it's reasonably thin, for example 20" then it would make sense to dig the hole deep enough to remove the clay and replace it with clay/compost mix. When I encounter spots of clay, I dig it down as much as I can and make clay + coarse sand + compost mix. Also, some rootstock will handle heavy soil better than the other.
6 days ago
Rémy,

This is a classic French beauty reminding me of "La Cité des enfants perdus" aesthetics.
Please share with us some pictures of the internals.
6 days ago
Talking in another thread about AI recompiling existing contents I decided to create more core contents and post some images from today's plaster making as we are finishing plastering our house inside.

I use plaster sand from Home Depot purchased in 1000 lbs sacks ($36) and LHoist high calcium lime (Type N) ($27). I have prepared the putty 4 days ago in a blue food grade barrel using 4 bags of lime, around 90 l of water and Bosch roto-hammer with SDS mixing paddle attachment to mix it all. It's more convenient to mix large amount at once in a large barrel - there is less scraping, remixing and splashing and it takes 3 times less time as compared to using multiple 5 gal buckets that also need lids. 1 bag of lime makes 2 such buckets of putty, so I would need 8 of them. 4 bags of lime filled 3/4 of the barrel with putty, so it should be enough for 450 kg of sand from the sack. Such amount of materials should cover 34 m2 of the wall area at the 10 mm of thickness.

The image descriptions explain the steps.
I'm using empirically determined ratio of 2.2 volumetric parts of sand to 1 volume of lime putty.
If the mix is too stiff, some water should be added, but a little bit at a time.
I use organic rice straw that I cut with heavy duty scissors to 3-8 cm length.
For the wheelbarrow batch I'm using 1.5 of small 2 gal bucket, so 3 gallons.
I have calculated to what height I should fill the bucket with lime to get 2.2 less lime putty than 3 gal of sand. I marked this height with regular pencil on both interior sides of the bucket and it survives multiple loads if putty.
6 days ago