
Hi all;
For the last two months or so I have been building a Walker design riserless core, black and white oven.
Matt calls this a BBQ.
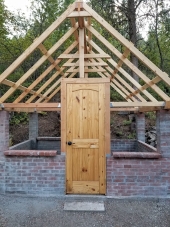
At the same time, I also have been building a brick smoke shack as an outdoor cooking area.
Progress has seemed slow at times, but it is gradually coming together!
The B&W oven is now finished and in use. (Thank goodness as its 90+ everyday)
What is extra nice is with the riserless core and an oven to pass the exhaust thru.
I have no fear or guilt using this oven during our High fire danger season.
After warm up I'm not even putting much smoke in the air!
The forest is currently under heavy restrictions, there is an 8000 acre and growing wild fire just 15 miles east of us.
The smoke shack needs more muriatic acid washing to clean the bricks better.
I'm stalling buying lumber for the roof until the rains start or the price of lumber comes back to earth!
Hoping the price drops before raindrops do!
I have designed lite weight pop in doors for the walker core and for any brick ovens.
The not quite refined doors are already announced at my website https://dragontechrmh.com/ I expect to start offering them for sale within the next few weeks.
I will be offering package deals, combining doors and quick-change secondary tubes.
With Matts core plans, you get a choice of using ceramic boards or split firebricks.
As this is an outdoor stove I choose to build with firebricks.
If i was building an indoor stove I would use CF boards to get an instant draw flowing.
When using firebricks there is a period of smokeback until the bricks heat up enough to carry the smoke away.
The lowest few levels in this oven , I used a cement mortar to create a permanent base.
After that I switched to a fireclay/sand mortar for the remainder of the build.
The split brick core, being all new bricks was dry stacked with no mortar and surrounded on all sides and the roof by 1" thick #8 density Morgan super wool.
For the roof of the oven chamber, I used chicken wire to support more Morgan Super Wool. (wonderfully safe useful stuff!)
The oven chamber has an exit to the chimney at the top for starting and smokeless white cooking.
There is another exit at the floor level that makes this a black oven for smoking.
An easily movable insulated brick can block either entrance for the cooking style of your choice.
I'm still learning how to operate this stove.
If I treat it like a batchbox and load it up a few times you will exceed 500F by quite a bit.
That's a might bit hot to cook most things, excepting maybe pizza.
Getting it to maintain 350F for hours is easy.
Getting it to do 225-250F for slow smoking is the biggest challenge.
Also I'm trying to make a super efficient stove produce tasty maple smoke... hmm oxymoron?
As a smoking oven my hardwood consumption has been drastically reduced!
I now get to use douglass fir to bring the stove up to temp and only use the maple in small pieces to produce tasty flavor!
This oven could easily be a home heating unit.
Even outdoors, once the bricks come up to temperature they take a long time letting that heat escape.
I will create a new thread on just the smoke shack build after it is complete.
Wow, love how you essentially built a building around the oven. The idea of dry stacking the core has always seemed sketchy to me... but looking at your pictures I guess there's really no way for an outside force to push inward where the wall bricks stack, so no real way for them to collapse in.
Are you worried at all about the chicken wire surviving long term?
Hey Matt;
I think it will be OK but... I'm planning on keeping a close eye on it .
Its easy easy to pop the roof if it does start drooping.
All the roof bricks are dry stack and the roof itself is 1/2" hardy board with clay mortar.
Yes, the dry stacking was new to me as well.
Short of brutalizing the core, with oversize wood there is nothing much can happen to it.
Also as the floor of the oven, over the core is dry stacked as well.
In the event of say , a brick cracking in ten years. I can access the core without complete disassembly.
Of course by using clay mortar the whole oven area can be redesigned!
I'm already thinking how I should have built a 16" slot to slide large pizzas thru!
Very nice. I think I'd cover the roof with some steel plate and then insulate with the ceramic wool. Although they make claims about this and that, who knows what happens to the structure of the wool after long-term use? And the steel can reflect heat down onto what is being cooked.
I've never seen any mass cooker reach Neapolitan cooking temperatures with the fire outside the oven. It just can't be done as heat carried by air is inefficient. If you want to cook Neapolitan you might as well consider the possibility of creating a fire in the black oven, in which case you'll need a decent chimney to take the smoke away from the chefs. In which case the oven needs to be lined with fire bricks. Good job it's all dry stacked! New York style pizza can be done at ordinary baking temperatures.
Hi Graham; I'm not sure how hot I can push this oven.
My current temp gauge only reads to 500F. The day I treated this like a batchbox. In no time my gauge was inches beyond 500!
How hot??? Maybe 650F at that time? I stopped adding fuel at that point and with the temp gauge maxed out, I would only have known if I opened the oven door and used a digital infrared gun. Of course the heat would be rolling out as soon as I did.
Luckily I'm originally from the east coast, not Chicago..... Pizza is thin and round ! Not square and thick...
As far as the roof and insulation. I only use Morgan Superwool , it is NON ceramic blanket. There is no MSDS sheet on this product as it has no hazards.
A steel plate might increase radiation down into the oven but how to insulate the top side?
Throw ceramic blanket over it? The blanket would be quickly removed by birds and rodents as FINE nest material...
Or I would need to cover the insulation to protect it.
I think I'll stick with what I have. The chicken wire may fail at some point but it's only an hours work to replace it.
But pizza ovens need conductive, radiant, and convective heat. And your design is mainly going to provide convective heat with no radiant, and only conductive after several hours if you have high mass floor.
My rocket oven gets quite hot and it is a white oven. The heat riser dumps white-hot fire directly onto the oven. I typically put the pizza in when the thermometer is at 600 degrees Fahrenheit (315 Celsius) and that works very well.
So, I will dispute the claim that you have to have a stinky smoky "fire in the cooking space" oven to make excellent pizza.
Oh! And, it takes less than an hour to get to VERY high temperatures. If I have kindling sized dry wood I can get to 600 degrees in about half an hour.
This is why the rocket oven is so awesome. You can actually make pizza for dinner, it doesn't have to be an all-day affair where you take hours to heat up a mass.
I have also used it to roast apples at about 350F. For this, you use bigger pieces of wood, and cover part of the opening where you put the wood to slow down the air flow.
I think that ‘what makes a good pizza’ is a subjective subject and for many people it would have to come out of a wood fired brick floor oven.
Not to say others would completely disagree and may consider the opposite to be the best!
My neighbour is a very vocal, Italian gentleman and I know what he would say ha ha…
Here is an example of a wood fire that no one is cooking Pizza's in.
15 miles east of my home .
Four days ago this was an 8000 acer fire.
This morning it is just shy of 18,000! Zero percent contained!
Thank goodness it is moving east ! No homes have been lost yet but almost 200 are evacuated.
Well Graham;
In some spots its heated past char, but in most your exactly right.
Forests rejuvenate quite well after a fire.
In times past, burning was quite common to keep fields fresh.
Graham Chiu wrote:
If your oven works then I'll copy it.
But pizza ovens need conductive, radiant, and convective heat.
I was responding to the idea of what "pizza ovens need." I'm telling you that my rocket oven is a very fine pizza oven, and with the addition of a pizza stone (or thick cast iron pizza cooking thingy, which is what I have now that my pizza stone broke) it makes very fine pizza. I've had pizza in Napoli, I know of what I speak.
A rocket oven is the most fun wood burning device you can have in your backyard. It can be used during times of high risk for wildfires, as no hot coals/flakes/ash exit the chimney, due to the circuitous design. It uses far less wood than any other device, and makes less smoke. With a bit of extra work, you can make it an attractive asset in your outdoor living space. It heats up fast as it is NOT a high mass oven and it cools down fast for the same reason. This makes it easier to live with, no baby-sitting required.
I maintain that a reasonably handy person could make a fine living constructing these and installing them for those with more money than time and skill.
At last count I have 4 of those light weight insulated steel pizza ovens which work fine .. the original being the Bakerstone. All of them use a pizza stone, and the fire has to be kept going in order for them to work correctly. Some of them even have little rocket stoves attached!
However, I have yet to see anyone build successfully a domestic pizza oven that uses a brick floor that is heated by the exhaust gases of a rocket stove. If someone has a link, I'd love to see it.
Graham, I don't know why you think a brick floor is essential. The instructions for building the barrel rocket oven can be purchased here on this site, and the design works.
With some effort, the barrels can be contained in something that's lovely. It doesn't have to be a mosaic, it could be brick, with arches over the barrel, if that's your thing. It's not a gorgeous design, but it functions beautifully.
Currently I'm working on mosaics on either side of the box.
Nice work as always Thomas!
I think your oven roof design elegant, though both the chicken wire and the bare insulation sketch me out a little.
You know what your doing, so let's talk about the oven itself.
It looks like Matt's glass cooktop design with a bricks bell/oven in place of the glass.
Can one get a brick floored oven up to traditional pizza tempatures without building a fire in the oven itself ?
It seems like it .
The weird thing is the layer of insulation between the burn tunnel and the bricks of the oven floor.
It seems counter intuitive, but it certainly works.
The Black opening seems to be placed low, as one would normally do in a bell.
The White opening is placed high, almost like a bypass.
I have been primed to think that a White oven only has exhaust streaming around it, never through it.
I suppose it hardly matters, if your simple aim is to avoid smoke taste, the rocket exhaust seems clean enough for that.
I've been hanging out at smokingmeatforums.com , they would be interested in your build.
They did advise against locating the exhaust down low in a smoke chamber, to avoid bad flavor from meat that sat in slow moving smoke.
Again, they are not used to the clean burns that a rocket stove delivers.
Im wondering if a black iron pot placed right above the exhaust coming from the core would be a good place to put the smoking wood.
It could work like a hot plate or soldering iron smoker does, keeping the wood just at smoldering tempatures.
Hi William:
Thanks for the compliments!
The chicken wire is experimental, it may fail. Easily replaced if it does.
The Morgan Superwool is 100% safe I have no issues with it at all.
This walker core is the same one that the tiny cook stove has.
Insulating the core including the roof is necessary to bring it up to rocket temps and keep it there.
I will say that unlike a batch or J tube , using splits rather than CFB, it is a hard starting stove. Generally 20 minutes before it quits wanting to draft out the door rather than up thru the oven.
After it has warmed up it roars!
Yes , I can easily bring this over 500F for pizza cooking. By sliding the pizza pan partially over the core opening it browns up the crust just right!
As far as smoking properly in it. First I heat up the core and bring the oven up to 225-250, using regular fir and larch firewood.
Once it is cruising then I switch to hardwood. Generally Maple but I love Hickory when I can get it.
I use small pieces and toss them in the core, By that point it has burned down to hardly any coals at all but the temperature inside is still way up there.
Those hardwood pieces start smoldering and provide that oh so good smoky flavor! They do ultimately burst into flame but that is just supplying more coals for the next hardwood pieces.
I will experiment with a cast iron plate over the core exhaust to see if that is hot enough to smolder wood. Might be a good idea!
First Improvements to the B/W oven.
A Squirrel guard ! More precise a PINECONE guard!
After seeing one of our industrious tree squirrel's sitting innocently on top of my chimney I realized what future catastrophe could happen...
I envisioned not using my oven for a few weeks only to return and find it full of pine cones!
Not wanting to clean up that mess I located a small stainless grill and added one more layer to my chimney bricks.
I now have my Outdoor stove protected from vandalizing teenage squirrels!
Hey Max;
Yes it performs great.
As I used split heavy bricks, the riserless core takes a little while to start rocketing but after it heats up it burns as clean as my batchboxes!
I can push it hard and run a temp well over 500 F for pizza cooking.
Cooking at 350 F is very easy.
Slow cooking at 225 F is harder as the core wants to rocket up any new fuel, but it can be done.
Smoking foods is harder yet trying to keep temps down.
I am going to try placing a cast iron plate partially over the core exit into the oven.
The hope is that temps there might be better to smolder wood rather than have it burst into flame like it does in the core.
Connected to a chimney pipe this would make a fine, home heating / cooking stove.
It stays warm even outdoors for many hours.
So far I have cooked Whole stuffed chickens, pork roasts , beef roasts, Pork chops baked in bbq sauce, baked potatoes, cheese, although my cold smoker is better for cheese.
Now that I have a roof over it... let it snow! I'll be cooking all winter out there.
We have been off grid since 2014 and cooking on wood stoves during the heating season since then. First with a small Jotul f602 in our tiny house then our current situation is on a 48” Kitchen Queen. It heats our water and bakes incredible bread. It works amazingly well but is a hungry monster. We go through at least 6 cords to cook and heat our 1200 square foot hall and parlor 2 story home. There’s usually a window open because it’s so hot while cooking. The indoor air quality is extremely dry and dusty despite having a large pot of boiling water on at all times. We are all fair skinned and have very itchy winters. It’s an incredible appliance and works extremely well, but at this point we would trade the cooktop for a masonry heater with an oven and our hot water element.
We purchased Matt Walker’s Continental plans and thought of positioning the water pipe at the exit of the burn chamber into the bell. We also considered making a steel oven box to fit in the bell.
Would it make sense to delete the cooktop and position the oven above it like you have here?
Then we could route the gasses through a mass to make a bench to sit on?
Hi Alex;
The beauty of Matts plans is his riserless core.
Once you know how to construct the core and properly insulate it you can build anything you want from it.
I also have an old Majestic wood cook stove. It is a wonderful stove! Cooks , bakes, mine no longer heats water but it originally did.
To try to heat a home with it is not so much fun.
As you say it will go thru bunches of wood and run you out of the house with how much heat they produce!
There is also the little detail of how much of your heat is leaving up the chimney!
You will be much happier with a masonry stove.
It takes a few hours to really heat up the brick... BUT once heated you let your fire go out and just enjoy hours of the the baking warmth let off from the bricks.
My oven can slow cook at 200-250 or put out 600F in the oven if you load it up several times.
I suspect that heating water will work , but you may not get nearly as hot water as you currently are from your wood gobbler cook stove.
It would depend on the location of the pipes in relation to how close they are to the core.
As always, heating water with a rocket stove must be done carefully so as not to produce steam in your pipes!
Finally had time to mount my propane 2 burner in the outdoor kitchen.
We had been setting it on a bucket with a board.
Its base is masonry bolted down to the bricks, I may put a leg under the outside corner if I think it needs one.
Well my good "old" propane two burner decided to spew flames out the bottom while Liz was cooking the other evening.
She was not burned but got a nice goose egg on her head rushing around the outside of the building to turn off the tank and bumping her head on the rafter.
I suspect a bee nest in the propane vent.
I didn't even look... upset hurting wife... the offending M.F. goes away.
Needless to say after 25-30 years the "OLD " stove now rest on top of the pile in the back 40 super store!
Maybe it can donate parts or just take a trip to the recycling center.
Here is our new 2 burner! Holy cow what an improvement!
These burners are probably double the output of the old.
They even turn down to simmer without going out as soon as you walk off!
Sturdy angle iron frame.
I think this stove will still be in use as long as the brick smoke shack stands.
Oh, WOW! I'm so glad Liz wasn't hurt worse! I hope her goose egg heals up, fast! <3 <3 <3
On a re-use-it vein, I could see the body of the stove & burner grates on top of a small rocket stove, or in the garden, with a couple flower pots in it... probably other ideas too... after coffee, lol
So sorry for your head bump Liz.
I know what it’s like to be tall and have things just above your line of sight smack you in the head.
(The rear hatch to the van comes to mind).
Heal quickly!
Hi all;
Yesterday I mounted the antique solar panels to the side of the building.
I was thinking of mounting them up on the roof but I decided that was not necessary.
I only use a tiny sip of power to run the led lights.
As long as they get some sun on winter days this location will keep the battery topped up.